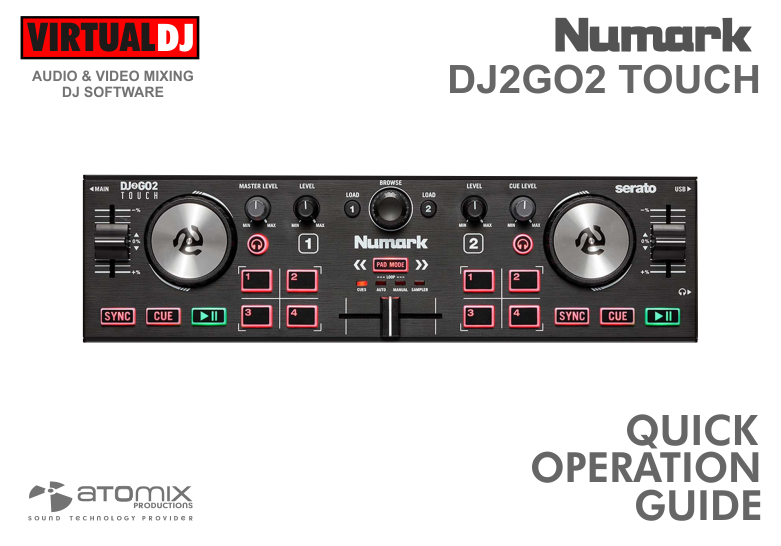
Numark DJ2GO2 TOUCH
SETUP
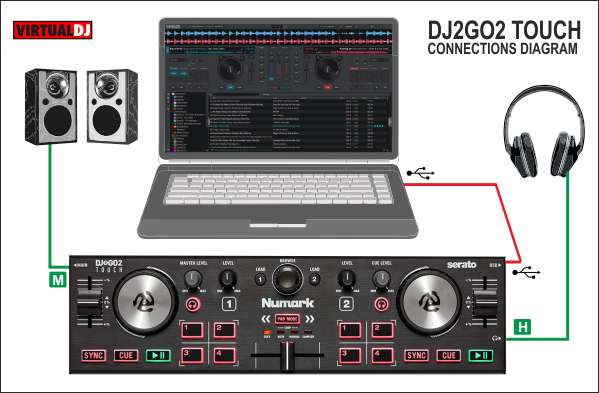
Connections
Connect the unit’s USB socket with a USB port of your computer using the provided cable. Connect a pair of amplified speakers or amplifier to the Master Output at the left side panel and a pair of headphones to the left side panel of the DJ2GO2 Touch
Drivers
No driver is required to be installed. The DJ2GO2 Touch is a USB Class compliant device and your Operating system will automatically install the necessary drivers once the unit is connected to your computer via a USB port.
VirtualDJ Setup
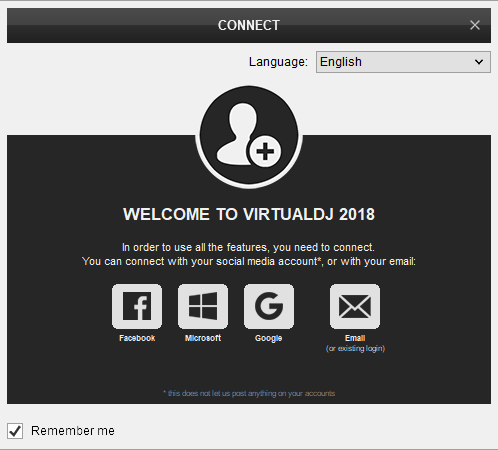
Once VirtualDJ 8 is launched, a Login Window will appear. Login with your virtualdj.com account’s credentials.
A Pro Infinity, a PLUS or a Pro Subscription License is required to use the Numark DJ2GO2 Touch. Without any of the above Licenses, the controller will operate for 10 minutes each time you restart VirtualDJ.
http://www.virtualdj.com/buy/index.html
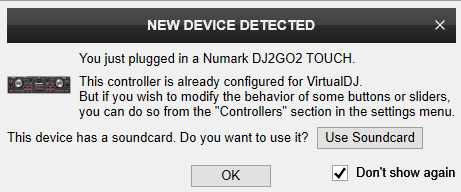
Select “Use Soundcard” and click OK
The unit is now ready to operate with VirtualDJ.
MIDI Operation
The unit should be visible in the CONTROLLERS tab of Config and the “factory default” available/selected from the Mappings drop-down list.
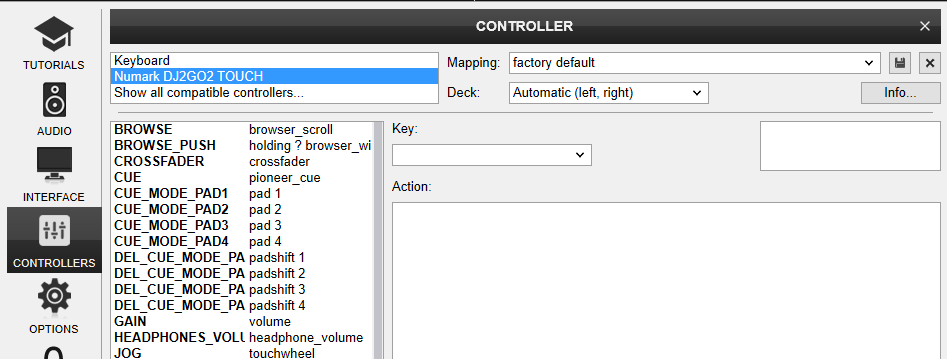
The factory default Mapping offers the functions described in this Manual, however those can be adjusted to your needs via VDJ Script actions.
Find more details at http://www.virtualdj.com/wiki/VDJ8script.html
AUDIO SETUP
The unit has a pre-defined Audio setup and a special button in the AUDIO tab of Config to provide that.

For further software settings please refer to the User Guide of VirtualDJ 8.
http://www.virtualdj.com/manuals/virtualdj8/index.html
CONTROLS
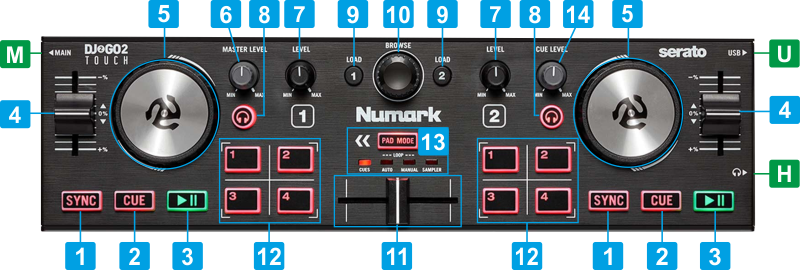
KEY
ACTION
Preview track when paused while button is pressed
Jumps and stops to the Cue point when playing
Vinyl mode can be enabled/disabled from VirtualDJ GUI
Hold for more than 1 second to unload the same deck
Push to toggle focus between Folders and Songs List.
When in Folders list, push for more than 1 second to expand/collapse sub-folders
PADS
The 4 numbered Pads of the Numark DJ2GO2 Touch offer different functionality, depending on the selected Mode. Use the PAD MODE button to cycle through the 4 available modes (Hotcues, Auto Loops, Manual Loop and Sampler).
HOTCUES
The unit will initialize with the Hotcues mode selected. To select the Hotcues mode - if another is selected - use the PAD MODE button until the first Led (CUE) is lit.
The Hotcues page will be then selected and displayed in the VirtualDJ GUI
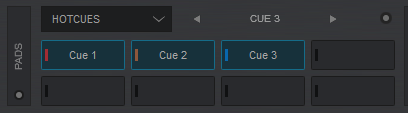
In this mode the 4 numbered Pads assign a Hotcue (1-4) or trigger the Hotcue (if assigned). Hotcues further to 4 can be triggered from the GUI.
To delete an assigned Hotcue, hold down the PAD MODE button and then use one of the 4 Pads.
AUTO LOOPS
Use the PAD MODE button until the second Led (LOOP) is lit to set the Pads to Loop mode. The special GO Loop page will be then selected and displayed in the VirtualDJ GUI
Note : The special GO Loop page is only available when the DJ2GO2 Touch is connected

In this mode, the 4 numbered Pads trigger an auto-Loop of a different size in beats, depending on the selected Loop Bank.
3 different Banks are available (Small, Normal and Large) offering loop sizes from 1/8 to 64 beats. Use the arrow buttons on the Skin to select the next/previous Loop bank
MANUAL LOOPS
Use the PAD MODE button until the 3rd Led (MANUAL) is lit to set the Pads to Manual Loop mode. The special GO Manual Loop page will be then selected and displayed in the VirtualDJ GUI
Note : The special GO Manual Loop page is only available when the DJ2GO2 Touch is connected
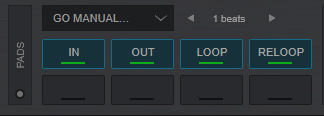
In this mode, the 4 numbered Pads trigger actions as following:
- Pad 1(Loop In) : When not in Loop, sets the current track's position as the beginning of the Loop. When in Loop, jumps track back to the beginning of the loop
- Pad 2(Loop Out) : When not in Loop, sets the track in loop, starting from the last set Loop In point. When in Loop, exits the Loop
- Pad 3(Loop) : Triggers an Auto Loop of the selected size in beats. Exits the Loop if in loop. The beats size can be selected from the VirtualDJ GUI
- Pad 4(Reloop) : If not in loop, enables the last triggered Loop (and jumps to its beginning). If no Loop is triggered before, the pad will not execute any action. If in Loop, will jump to its beginning
SAMPLER
Use the PAD MODE button until the 4th Led (SAMPLE) is lit to set the Pads to Sampler mode. The Sampler page will be then selected and displayed in the VirtualDJ GUI
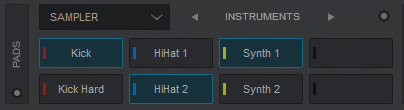
In this mode, the 4 numbered Pads will trigger a Sample (1-4) from the selected Sampler Bank of VirtualDJ.
If the selected Bank has less than 5 samples, both sides of the DJ2GO2 Touch will trigger the same Samples. If the selected Bank has more than 4 Samples, the left side of the DJ2GO2 Touch will trigger samples 1 to 4 and the right side will trigger samples 5 to 8. Samples further to slot 8 can be triggered from the Sampler view of Sideview, either by selecting a different Sampler Layout view or the List view.
See further details about Sampler in VirtualDJ User Guide http://www.virtualdj.com/manuals/virtualdj8/interface/browser/sideview/sampler/index.html
Use the arrow buttons on the skin, to select a different Sampler Bank or choose a different Trigger mode (On/Off, Hold, Stutter or Unmute).
